Post-Op Instructions
At Boise Dentistry Co, your comfort and recovery are just as important to us as your treatment itself. We’ve provided post-operative instructions for a variety of treatments to help you protect your results, support proper healing, and maintain the healthiest smile possible. Following the recommended care instructions after your procedure can make a significant difference in your comfort, recovery, and long-term oral health. Please review the instructions that apply to your treatment, and contact our team if you have any questions along the way.
Surgical Teeth Extractions
Surgical Teeth Extractions
Proper care after surgery has an important effect on healing. Please read the following instructions carefully.
IMMEDIATELY AFTER SURGERY:
- Bite firmly on the gauze pads covering each surgical site to help stop the bleeding. We will change the gauze before you leave the office. You may need to change the gauze pads once more at home, leaving the gauze in for an additional 30 minutes.
- Remember to remove the gauze before eating or drinking.
- You may have difficulty feeling your lips, cheeks, and/or tongue due to the numbness from the local anesthetic. This is a temporary feeling and it will wear off within 2-4 hours. Please take care not to bite your lips, cheeks and/or gums.
- Apply ice packs to your face to reduce swelling for the first 48h hours after surgery.
- Take the pain medication as prescribed as soon as possible.
- Do not rinse or spit the day of the surgery, as this may prolong the bleeding.
- Make sure to get lots of rest on the day of the surgery.
BLEEDING
One of the most common concerns after surgery is bleeding. Surgery causes an increase in salivary flow which in addition to the normal oozing of blood may alarm you unnecessarily. Some oozing is normal for 24 to 48 hours following surgery and should not be a concern. It is common for saliva to be slightly blood tinged for several days following surgery.
- Use a piece of gauze (or a moist teabag), folded into a small wad, and place it over the surgical site. The idea is to apply gentle pressure on the surgical site. Apply pressure for at least 20-30 minutes after surgery. The gauze can be changed when it feels saturated. One may need to change the gauze and repeat the previous steps a few times to decrease bleeding. If bleeding is controlled, the gauze is no longer necessary.
- DO NOT rinse your mouth or use a straw for the next 24 hours.
- DO NOT smoke or consume alcohol for the next 24 hours.
- DO NOT perform strenuous activities for the next 3 days.
If you are bleeding excessively, apply firm pressure by folding and placing a gauze pad directly over the surgical site and bite firmly on the gauze for one hour. Excessive bleeding is defined as pooling or dripping of blood out of the surgical sites within 15-20 seconds of removing the gauze. If excess bleeding continues, apply a gauze pad for an additional 30 minutes. If excessive bleeding persists, contact our office at (208) 939-7053, or for after-hours, reach out to our on-call service at the same number.
PAIN MANAGEMENT
Some amount of discomfort is to be expected following any surgery. Please take the medications as prescribed by your surgeons. It is best to go to the pharmacy immediately after your surgery to fill your prescription. That way you can begin to take the pain medications prior to the local anesthetic (freezing) wearing off.
Take medications exactly as prescribed.
Typical Pattern
- Ibuprofen/Advil + acetaminophen/Tylenol often work better together than either alone
- Stronger medication may be prescribed for breakthrough pain
Example commonly used schedule (only if approved by your surgeon):
- Ibuprofen 600 mg every 6 hours
- Acetaminophen 500–1000 mg every 6 hours
- Alternate them every 3 hours
Do NOT Exceed
- 3200 mg/day ibuprofen
- 3000 mg/day acetaminophen (lower if liver disease or alcohol use)
ANTIBIOTICS
If prescribed:
- Finish the full course
- Take with food unless instructed otherwise
- Report rash, severe diarrhea, or breathing difficulty immediately
INFECTION
- If the surgeon thinks that you will benefit from an antibiotic, you will receive a prescription for one. If prescribed, take as directed. It is important to ensure you finish the full course of the antibiotic.
If you are experiencing nausea you may TEMPORARILY stop taking the antibiotic until the nausea subsides, however you must always restart and finish the antibiotics as directed.
- If any medications cause hives or itching, discontinue them immediately and call the clinic.
Call our office if you notice any signs of infection including:
- Increased pain or swelling after 5 days
- A foul taste or odour in your mouth
- A temperature above 38°C
SWELLING
Swelling around the mouth, eyes, and cheeks is a normal reaction to the surgery and usually takes 2-3 days to fully develop. To help prevent swelling:
- Apply ice packs to the cheeks for 20 minutes on and 20 minutes off. Keep your head elevated for first 48 hours after surgery. Use crushed ice in a ziplock bag or a bag of frozen peas bag wrapped in a moist cloth to prevent frostbite.
- After the first 3 days, you can begin using a heating pad or moist heat for relief of swelling, bruising, and stiffness of the jaw. Apply heat 4 times/day for 30 minutes time intervals.
DIET
Try to resume a normal diet after the first 3 days. Initially you may feel more comfortable with a softer diet. Suggested foods are soups, noodles, scrambled eggs, pasta, pudding, yogurt, ice cream, juices, milkshakes, pancakes, and anything soft that you can tolerate. Drink lots of fluids to stay hydrated. Avoid straws as they can dislodge the blood clot cause bleeding. Avoid hard and crunchy foods such as chips that may disturb the surgery site for at least 5 days. No alcoholic beverages should be consumed for at least 24 hours post anaesthetic or as long as you are taking the narcotic pain medications and antibiotics.
WOUND CARE
If prescribed to you, use the Peridex (Chlorohexidine 0.12%) mouth rinse 2-3 times a day after brushing. Swish for 60 seconds then spit it out. You may also rinse your mouth with a salt-water solution (1/2 tsp salt in 1 cup of water) several times daily.
Sutures (Stitches)
Your sutures will dissolve on their own 1-2 weeks after the surgery. You may notice that they loosen after the swelling of your gum tissues decreases. This is completely normal.
Resuming Activities
On average most patients will take 1-2 days off from normal activity. You may return to work/school when you feel you are recovered. Do not engage in strenuous activities for 2 weeks following your surgery.
Dry Socket
After a tooth extraction it is important for a blood clot to form to stop the bleeding and begin the healing process. A dry socket occurs when the blood clot is dislodged from the surgery site exposing the bone and the fine nerve endings. A small percentage of patients may experience a dry socket. Signs of dry socket generally consist of an increase in jaw discomfort 3-6 days after surgery that is not relieved by pain medication. If this happens please call the office. To avoid a dry socket follow these precautions:
- Do not smoke
- Avoid sucking action from smoking, spitting or using straws for first 24 hours.
- Clean the extraction site as described in the wound care section
- Do not rinse your mouth excessively for first 24 hours as it interferes with blood clotting.
SMOKING
Do not smoke for at least 3 days following surgery.
BRUSHING AND RINSING
The day of surgery you may brush your teeth, but try to avoid the surgical site for at least 5 days. Avoid rinsing, or spitting the day of surgery. If you wear a retainer, you may continue to wear it, if it is comfortable for you to do so.
BONE CHIPS
Occasionally small chips of bone may appear in the surgical site. This can happen anywhere from a few days to several weeks following surgery. Usually they will eventually fall out by themselves. If they are causing you significant discomfort you can contact our clinic for an appointment.
NUMB LIPS & CHIPS
Lip numbness on the side of surgery is known as “paresthesia.” It is most often a temporary condition that will correct itself. It can last a variable length of time. If it lasts greater than 3 weeks please notify the office.
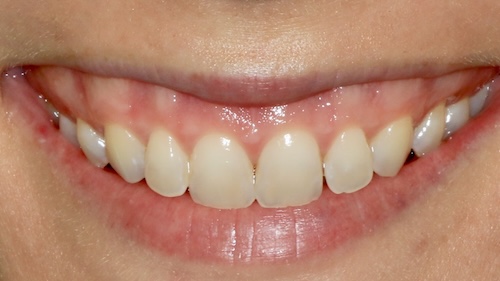
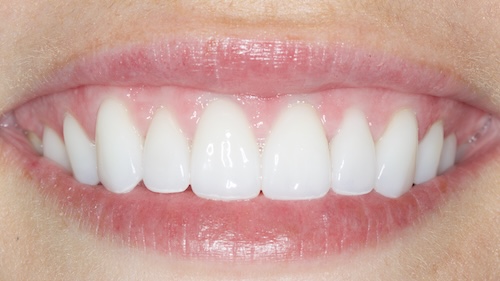
Teeth Bleaching
Care
Teeth Bleaching Care
To Obtain the Best Bleaching Results:
- Before bleaching, thoroughly brush and floss your teeth to make sure you remove any plaque and food particles so the bleaching gel will make contact with the surfaces of your teeth.
- While bleaching, please do not drink liquids or foods that stain your teeth such as coffee, red wine, etc.
- Fill the bleaching trays with a pea size amount of material provided. Properly filling the bleaching trays is critical to achieving maximum whitening results, because it ensures a proper seal of the bleaching trays.
Dispense a dab of bleaching gel into each tooth on the inner side of the outer walls of the bleaching trays, EXCEPT in the second molars and around any porcelain restorations. - Seal the bleaching trays against your teeth.
a. Place the bleaching trays over your teeth, and push the trays firmly onto your teeth.
b. The thick gel will push the sides of the tray away from the teeth at the gum line a little. It is very important to gently push the tray back against the teeth.
c. You should see just a little excess gel has squeezed out of the edge of the tray as the trays are gently pushed back against the teeth.
d. If you see an excessive amount of gel, the trays have been overfilled. If you see no gel has squeezed out, the trays have been under-filled.
e. Adjust accordingly the next night. - Wear the trays for only 30 minutes the first night to determine if your teeth experience sensitivity.
a. If you experience sensitivity, we recommend the use of Cari Free PRO Gel 5000 or Ml Paste to be placed in the tray immediately after bleaching for 30 minutes. Use this as your preferred toothpaste the entire time until the end of your bleaching process.
b. Note: CariFree PRO Gel 5000 can also be used to replace your current toothpaste. - Then on the second day and subsequent days:
a. Wear the trays for 15-30 minutes, remove the trays, rinse the trays with cool water.
b. Reapply fresh bleaching material and then replace the tray back over your teeth in the same manner for another 15-30 minutes. - When You Remove Trays:
a. Upon removing the trays, rinse your mouth and clean your bleaching trays with cool tap water.
b. Avoid using warm or hot water, as it could affect the fit of your trays.
c. Shake the excess water off the trays and place them back into the tray container. Do not close the container. Leave the case open so the trays will dry out before the next use. - In most cases, the desired results can be obtained in 2-3 weeks but in some cases of very discolored teeth, the process may take longer.
Immediate
Dentures
Immediate Dentures
First 24 Hours
KEEP THE DENTURES IN PLACE:
- Do not remove your dentures for the first 24 hours unless your dentist specifically instructed you otherwise.
- The dentures act like a bandage and help:
- control bleeding
- reduce swelling
- protect extraction sites
- help tissues heal properly
Removing them too early can increase swelling and make reinsertion difficult.
BLEEDING
- Slight oozing or pink saliva is normal for 24–48 hours.
- If bleeding increases:
- Bite gently on clean gauze for 30–45 minutes.
- Keep your head elevated.
- Avoid spitting, rinsing forcefully, or using straws.
Contact your dentist if:
- bleeding is heavy
- large clots continue forming
- or bleeding does not slow after several hours
SWELLING
- Swelling typically peaks around 48–72 hours.
- Use an ice pack:
- 20 minutes on
- 20 minutes off
- during the first day
After 48 hours, warm compresses may help.
PAIN MANAGEMENT
Take medications exactly as prescribed. Common recommendations may include:
- OTC pain relievers such as Ibuprofen or Acetaminophen
- prescribed antibiotics if indicated
Avoid:
- taking more than directed
- alcohol while using prescription pain medication
DIET
For the first few days:
- Eat soft, cool foods.
- Stay hydrated.
Good Choices:
- yogurt
- mashed potatoes
- scrambled eggs
- smoothies (without straws)
- soup (lukewarm, not hot)
- oatmeal
- Pudding
Avoid:
- crunchy foods
- spicy foods
- hot liquids initially
- nuts/seeds
- sticky foods
- chewing gum
After the first 24 Hours
REMOVING AND CLEANING DENTURES
After your follow-up appointment or after the first 24 hours if instructed:
DENTURE CLEANING
- Remove dentures gently
- Rinse after meals.
- Brush dentures daily using:
- a denture brush or soft brush
- mild soap or denture cleanser
Avoid:
- regular toothpaste (too abrasive)
- bleach
- boiling water
ORAL RINSES
Rinse gently with:
- warm salt water
- 1/2 teaspoon salt in 8 oz warm water
- 3–4 times daily
Do not rinse aggressively.
OVERNIGHT REMOVAL
Once approved by your dentist:
- remove dentures at night
- store them in water or denture solution
This helps prevent fungal irritation and tissue soreness.
EATING WITH NEW DENTURES
Learning to eat with dentures takes time.
Tips:
- Start with soft foods cut into small pieces.
- Chew slowly.
- Chew on both sides at the same time for stability.
- Gradually reintroduce firmer foods.
Expect:
- increased saliva
- mild gagging
- altered speech
- sore spots
SORE SPOTS AND ADJUSTMENTS
Almost everyone needs adjustments after immediate dentures. Do not attempt to adjust dentures yourself.
Call the Boise Dentistry Co office if you develop:
- painful sore spots
- sharp pressure areas
- inability to chew
- looseness
- clicking
- difficulty speaking after the adjustment period
Frequent adjustments are normal during healing because gums and bone shrink after extractions.
HEALING EXPECTATIONS
Normal findings:
- mild swelling
- bruising
- sore gums
- increased saliva
- temporary speech changes
- mild discomfort while chewing
Healing timeline:
- Initial healing: 1–2 weeks
- Gum shrinkage: several months
- Final denture reline or remake may be needed after healing stabilizes
WHAT TO AVOID:
For at least several days:
- smoking or vaping
- alcohol
- straws
- vigorous rinsing
- spitting forcefully
- hard/crunchy foods
Smoking significantly increases the risk of delayed healing and dry socket.
CALL US IMMEDIATELY IF YOU HAVE:
- Fever
- Severe swelling worsening after 3 days
- Difficulty breathing or swallowing
- Severe pain not relieved by medication
- Heavy bleeding
- Pus or foul taste/odor
- Dentures that cannot be reinserted
- Broken dentures
Conventional Dentures
Conventional Dentures
Conventional dentures (full or partial) require an adjustment period physically, mentally, and socially. Most people adapt successfully, but it takes time, practice, and periodic adjustments.
UNDERSTANDING CONVENTIONAL DENTURES
Conventional dentures are typically made:
- after gums have healed from extractions
- to replace missing teeth
- from acrylic and/or metal frameworks
Types include:
- Full upper dentures
- Full lower dentures
- Partial dentures
Lower dentures are usually harder to adapt to because the tongue and movable lower jaw reduce stability.
WHAT TO EXPECT DURING THE FIRST WEEKS
Week 1–2: Initial Adjustment Phase
Common experiences:
- Increased saliva
- Feeling “bulky”
- Mild gagging
- Difficulty speaking clearly
- Soreness or pressure spots
- Trouble chewing
- Dentures feeling loose
- Fatigue from wearing them
This is normal. Your mouth, tongue, cheeks, and muscles are learning a completely new way to function.
SPEECH CHANGES
You may temporarily:
- whistle on certain sounds
- slur “s,” “f,” or “th” sounds
- feel like your tongue has less room
Helpful strategies:
- Read aloud daily
- Practice difficult words slowly
- Speak deliberately
Most speech improves within several weeks.
EATING WITH DENTURES
Early Diet
Start with:
- soft foods
- small bites
- foods cut into pieces
Examples:
- eggs
- fish
- pasta
- cooked vegetables
- rice
- bananas
- soups
- yogurt
Avoid initially:
- steak
- crusty bread
- nuts
- popcorn
- sticky candy
- chewing gum
Learning to Chew
Dentures function differently than natural teeth. Important techniques:
- Chew slowly.
- Use both sides simultaneously.
- Keep food centered.
- Take smaller bites than before.
If you bite with only one side:
- dentures may tip or lift.
Foods That May Always Be Difficult
Even well-fitting dentures can struggle with:
- corn on the cob
- apples bitten whole
- tough meats
- sticky caramel
- hard nuts
- very crunchy foods
Most people adapt by:
- modifying food preparation
- cutting food smaller
- avoiding certain foods occasionally
SORE SPOTS AND ADJUSTMENTS
Very Important:
New dentures almost always require adjustments. Pressure points can create:
- ulcers
- red areas
- painful chewing spots
Do NOT:
- use sandpaper
- grind them yourself
- use household glues
See your dentist for adjustments.
DENTURE ADHESIVES
Adhesives can improve:
- confidence
- retention
- chewing stability
But they should not compensate for severely poor fit. Common adhesive forms:
- creams
- powders
- strips
Use only small amounts. If you need large amounts daily:
- your dentures may need relining or replacement.
DAILY DENTURE CLEANING
Every Day
- Remove and rinse after meals if possible.
- Brush dentures
Use:
- soft denture brush
- mild soap or denture cleanser
Avoid:
- regular toothpaste (abrasive)
- bleach
- hot water
Even without teeth:
- brush gums
- tongue
- palate
- Cheeks
This reduces:
- bacteria
- fungus
- bad breath
OVERNIGHT CARE
Most patients should remove dentures while sleeping.
Benefits:
- allows tissues to rest
- lowers fungal infection risk
- reduces irritation
Store dentures in:
- water
- denture soaking solution
Never let dentures dry out.
COMMON EMOTIONAL & SOCIAL ADJUSTMENTS
Many people experience:
- self-consciousness
- frustration
- fear of dentures moving
- embarrassment eating socially
This is extremely common early on. Confidence usually improves with:
- practice
- proper fit
- adaptation
Helpful strategies:
- Practice eating at home first
- Start with trusted social settings
- Carry adhesive/travel kit if helpful
LONG-TERM CHANGES YOU SHOULD EXPECT
Bone Shrinkage (Resorption)
After teeth are removed:
- jawbone slowly shrinks over time
This is normal but ongoing.
Consequences:
- looser dentures
- facial changes
- reduced stability
- thinner lips/cheeks
Lower jaws shrink faster than upper jaws.
RELINES AND REPLACEMENTS
Dentures are not permanent forever.
Typical maintenance:
- Adjustments: first weeks/months
- Relines: every few years
- Replacement: often every 5–10 years
Signs dentures need evaluation:
- rocking
- clicking
- sores
- frequent adhesive use
- difficulty chewing
- visible wear
ORAL HEALTH RISKS WITH DENTURES
Poor denture hygiene can contribute to:
- fungal infections
- bad breath
- stomatitis
- ulcers
- angular cheilitis
Watch for:
- redness
- burning
- white patches
- cracks at mouth corners
SLEEPING WITH DENTURES
Usually not recommended long term unless directed medically. Sleeping with dentures may increase:
- irritation
- fungal infection risk
- inflammation
LIFESTYLE EXPECTATIONS
Eating
You can usually eat:
- most normal foods
- softer meats
- cooked vegetables
- sandwiches
- restaurant meals
But dentures generally provide less bite force than natural teeth.
Bite force comparison
Natural teeth generate much stronger chewing efficiency than conventional dentures.
Social Life
Most modern dentures look natural.
With proper fit:
- people usually cannot tell you wear dentures
- speech becomes normal
- smiling confidence improves
Physical Activities
Dentures usually stay stable during:
- walking
- light exercise
- conversation
But high-impact activity may require:
- adhesive
- implant stabilization in some cases
Lower Dentures: Special Challenges
Lower dentures commonly:
- move more
- float during speaking/eating
- feel less secure
Reasons:
- smaller surface area
- tongue movement
- less suction
Many patients eventually consider:
- implant-retained lower dentures
These can significantly improve:
- stability
- chewing
- confidence
WHEN TO CONTACT YOUR DENTIST
Seek evaluation for:
- persistent sores
- cracked dentures
- sudden looseness
- inability to chew
- severe gagging
- pain
- white patches or fungal symptoms
- denture breakage
REALISTIC EXPECTATIONS
Dentures restore:
- appearance
- speech
- basic chewing function
But they are not identical to natural teeth. Adaptation takes:
- patience
- practice
- follow-up adjustments
Most successful denture wearers:
- learn modified chewing habits
- maintain good hygiene
- keep regular dental visits
- accept periodic maintenance as normal
Periodontal
Therapy
Periodontal Therapy (Scaling and Root Planing)
Your gums may be tender, so please follow the instructions closely for the next 48-72 hours to achieve the best results:
- Be careful chewing until the numbness wears off.
- Eat a soft diet (soup/sandwiches).
- DO NOT SMOKE FOR AT LEAST 48 HOURS AFTER YOUR PROCEDURE. It is extremely important for the healing process to take place.
- Swish with warm salt water (1 tsp. salt to 8 oz. warm water) to help in soothing the irritated tissues. Rinse up to three times a day.
- For discomfort, take Advil, Motrin, or Tylenol 200-400 mg every 4-6 hours as needed. We recommend NOT taking aspirin.
- Begin gentle brushing, flossing, and irrigation with the tools given to you to clean between the teeth. It is important to keep the teeth and tissues as clean as possible.
- You may experience sensitivity of the teeth to hot, cold, or sweets. Please know that this varies from person to person. Depending on the severity of sensitivity, you would benefit from using Sensodyne toothpaste daily.
- If the sensitivity persists, we can get you prescription strength toothpaste to help.
- It is normal to experience some light bleeding up to two weeks after the therapy. If you experience any prolonged or excessive bleeding you should call our office.
- You may be given a product called CTX 4 Rinse to help keep the bacteria low and allow healing. Use this rinse 2 times daily for 2 weeks. Then 2 times a week until the rinse is gone. We may have you use this rinse 2 times per week for an entire year.
Congratulations again on your investment in good oral health! It is important to be aware that your success of the periodontal therapy is largely dependent on you and how you care for your teeth at home. Periodontal disease is not curable, only manageable.
The disease is maintained and stabilized with 3 month periodontal maintenance cleanings so we can keep the buildup and bacteria in the mouth low, inflammation at a minimum, and as a result, keep your overall health and cardiovascular health in good condition.
If you have any other questions or concerns regarding your periodontal condition, please don’t hesitate to call our office. Thank you for allowing us to take care of you – we’ll see you soon!
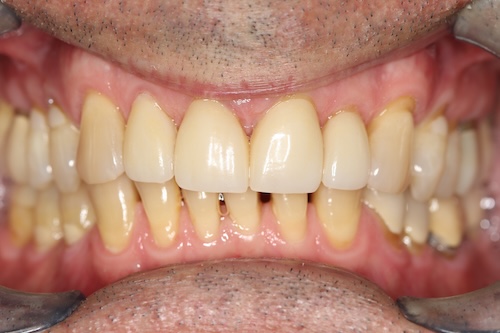
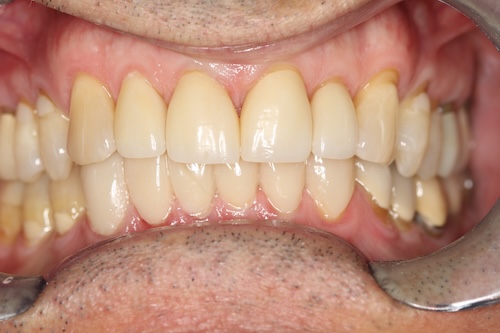
Dental Crowns and Bridges
Dental Crowns and Bridges
These instructions apply to:
- Permanent crowns
- Temporary crowns
- Fixed bridges
- Multi-unit bridge restorations
Some discomfort and adjustment are normal after crown or bridge treatment. Proper care helps prevent complications and improves long-term success.
IMMEDIATELY AFTER YOUR APPOINTMENT
Numbness
If local anesthetic was used:
- Numbness may last several hours.
- Avoid chewing until feeling returns fully.
Be careful not to:
- bite your cheek
- burn your mouth with hot foods/drinks
- chew your tongue or lips accidentally
Children and older adults may especially need reminders.
TEMPORARY CROWNS OR BRIDGES
Many patients wear temporary restorations while the final crown/bridge is being fabricated.
Temporary restorations are:
- weaker than permanent ones
- meant for short-term use only
- more likely to loosen or break
EATING WITH TEMPORARY CROWNS/BRIDGES
For the duration of the temporary:
- Chew carefully.
- Avoid sticky foods.
Avoid:
- caramel
- gum
- taffy
- hard candy
- ice
- very crunchy foods
Try to chew on the opposite side if possible.
SENSITIVITY IS NORMAL
You may experience:
- temperature sensitivity
- mild soreness around gums
- pressure sensitivity
- tenderness at injection sites
This typically improves within days to a few weeks.
COMMON OVER-THE-COUNTER MEDICATIONS SOMETIMES USED INCLUDE:
- Ibuprofen
- Acetaminophen
Take medications only as directed by your dentist or physician.
IF A TEMPORARY CROWN COMES OFF
This can happen occasionally.
If possible:
- Save the crown.
- Keep it clean.
- Contact your dental office promptly.
Do NOT:
- force it back aggressively
- use super glue or household adhesives
Temporary dental cement from a pharmacy may occasionally be recommended short term if instructed by your dentist.
Leaving the tooth uncovered too long may cause:
- tooth movement
- sensitivity
- difficulty reseating the final crown
CARING FOR YOUR TEMPORARY
Brushing
Brush gently but thoroughly.
Flossing Technique (Very Important)
Do NOT snap floss upward between temporary crowns or bridges.
Instead:
- Slide floss out sideways.
- Pull through gently.
This helps avoid dislodging the temporary.
AFTER PERMANENT CROWN OR BRIDGE PLACEMENT
Bite Adjustment Period
Your bite may feel:
- different
- taller
- uneven initially
Minor awareness is common for a few days. However, if you notice:
- hitting one tooth first
- pain when biting
- jaw soreness
- headaches
- difficulty chewing
You may need a bite adjustment. Even small bite discrepancies can cause significant discomfort.
GUM SORENESS
The gums around crowns/bridges may feel:
- irritated
- tender
- slightly swollen
This usually improves within several days. Helpful care:
- warm saltwater rinses
- gentle brushing
- excellent oral hygiene
Saltwater rinse:
- 1/2 teaspoon sal
- 8 oz warm water
- 3–4 times daily
SENSITIVITY AFTER CROWNS
Mild sensitivity to:
- cold
- pressure
- sweets
can occur temporarily. This may last:
- days
- weeks
- occasionally longer
Causes include:
- recent tooth preparation
- gum irritation
- nerve inflammation
Usually it improves gradually.
BRIDGE-SPECIFIC CLEANING INSTRUCTIONS
A dental bridge requires extra cleaning beneath the false tooth (pontic). Food and plaque can collect underneath.
Essential Cleaning Tools
You may need:
- floss threaders
- super floss
- interdental brushes
- water flossers
Cleaning under the bridge
Thread floss beneath the bridge daily:
- move gently back and forth
- clean along gumline
- clean supporting teeth carefully
Neglecting bridge cleaning can lead to:
- decay on supporting teeth
- gum disease
- bridge failure
LONG-TERM CROWN & BRIDGE CARE
Daily Hygiene
Brush at least twice daily. Use:
- soft toothbrush
- fluoride toothpaste
Clean around crown margins carefully. Crowns can still develop:
- decay at edges
- gum inflammation
- recurrent cavities
Foods to Be Careful With
Even strong crowns can fracture. Use caution with:
- ice chewing
- popcorn kernels
- hard candy
- pens/pencils
- fingernail biting
Porcelain restorations can chip under excessive force.
TEETH GRINDING & CLENCHING
Grinding can damage:
- crowns
- bridges
- natural teeth
If you:
- clench
- grind
- wake with jaw soreness
- break dental work repeatedly
Your dentist may recommend a night guard.
WHAT TO EXPECT WITH APPEARANCE
New crowns/bridges may initially feel:
- smoother
- bulkier
- shaped differently
Your tongue usually adapts within days. Speech changes are usually temporary.
LIFESPAN EXPECTATIONS
With good care:
- crowns often last many years
- bridges may function long term successfully
Longevity depends on:
- oral hygiene
- bite forces
- grinding habits
- gum health
- regular dental care
WHEN TO CALL US
Contact our office if you experience:
- severe pain
- worsening swelling
- persistent bite problems
- inability to chew
- crown looseness
- crown falling off
- bad taste or odor
- bleeding gums around crown/bridge
- cracked porcelain
- sensitivity worsening instead of improving
SIGNS A CROWN OR BRIDGE MAY NEED EVALUATION LATER
Watch for:
- floss shredding repeatedly
- dark lines at margins
- recurrent sensitivity
- mobility
- food trapping
- gum recession
- visible cracks/chips
EXPECTATIONS FOR BRIDGES SPECIFICALLY
Bridges restore:
- appearance
- chewing
- spacing
- speech
But supporting teeth carry extra load. Long-term success depends heavily on:
- meticulous cleaning
- regular exams
- healthy gums
Root
Canal
Root Canal
After a root canal, the tooth and surrounding tissues usually need a few days to settle down. Mild soreness is common, especially when chewing, but severe pain or swelling is not. These instructions cover what most dentists and endodontists recommend after treatment.
WHAT TO EXPECT
Common for 2–7 days:
- Mild to moderate soreness or tenderness
- Sensitivity when biting
- Jaw stiffness from keeping your mouth open
- Temporary numbness for several hours if local anesthetic was used
Less common but still possible:
- Mild swelling
- Temporary uneven bite sensation
Not normal:
- Rapidly increasing swelling
- Fever
- Severe throbbing pain that worsens
- Difficulty swallowing or breathing
- Pus or foul drainage
- Rash or reaction to medications
First 24 hours
Eating and drinking
- Do not chew until numbness fully wears off.
- Avoid chewing on the treated side.
- Eat softer foods:
- yogurt
- eggs
- soup (not extremely hot)
- pasta
- smoothies
- mashed potatoes
- Avoid:
- hard foods (nuts, chips, ice)
- sticky foods (caramel, gum)
- crunchy foods
- very hot beverages if numb
Pain control
If your dentist gave instructions, follow those first. Typical over-the-counter options for healthy adults:
- Ibuprofen (Advil/Motrin) often works best for dental inflammation.
- Acetaminophen (Tylenol) can also help.
Many dentists recommend alternating or combining them because they work differently. However:
- Avoid ibuprofen/NSAIDs if you have stomach ulcers, kidney disease, bleeding disorders, are on blood thinners, or were told not to take NSAIDs.
- Be careful not to exceed the daily maximum acetaminophen dose, especially if you drink alcohol or have liver disease.
If you were prescribed antibiotics:
- Take the full course exactly as directed.
- Antibiotics are not always necessary after a root canal.
REST
- Normal activity is usually fine.
- Avoid strenuous exercise the same day if you are sore or sedated.
Caring for the tooth
Temporary filling or crown
Many root canals are finished with a temporary filling before the permanent crown is placed. That temporary material is weaker than a final restoration.
Important:
- Avoid chewing hard foods on that tooth.
- Do not pull sticky foods across it.
- If the temporary filling falls out, call us right away.
Permanent crown
Back teeth that receive root canals often need crowns because they become more brittle over time. Do not delay your permanent crown appointment if one was recommended. Waiting too long increases the risk of fracture.
Oral hygiene
Continue brushing and flossing gently:
- Brush twice daily.
- Floss carefully around the treated tooth.
- Warm saltwater rinses can help:
- 1/2 teaspoon salt in a cup of warm water
- rinse gently 3–4 times daily
Avoid aggressive rinsing or poking the area.
PAIN TIMELINE
Typical recovery:
- Day 1–3: soreness peaks
- Day 3–7: gradual improvement
- After 1–2 weeks: most discomfort resolved
The tooth may remain mildly sensitive to pressure for a short time because tissues around the root tip were inflamed before treatment.
If you had sedation
If you received nitrous oxide, oral sedation, or IV sedation:
- Do not drive or operate machinery for the advised period.
- Avoid alcohol.
- Have someone stay with you if instructed.
When to call us immediately
Call our Boise Dentistry Co office if you have:
- swelling that increases after 2–3 days
- fever
- severe pain not controlled by medication
- allergic reaction to medication
- inability to close your bite comfortably
- cracked tooth or lost temporary crown
- persistent numbness beyond expected duration
Follow-up care
A root canal is usually only one step in restoring the tooth. You may still need:
- a permanent filling
- a crown
- follow-up X-rays
Healing around the root can take months even when symptoms improve quickly.
Implant/Bone
Graft
Implant/Bone Graft
Wondering what to expect after getting an implant? The healing process typically spans four to six months, with each stage bringing you closer to your new, natural-looking smile. Understanding this timeline helps you know what’s normal and how to best care for your investment.
WHAT HAPPENS DURING DENTAL IMPLANT SURGERY
The foundation of your new tooth begins with the surgical placement of a titanium post into your jawbone. This biocompatible metal post serves as an artificial tooth root that will eventually support your new tooth.
During the procedure, your dentist or oral surgeon administers local anesthesia to ensure you’re comfortable. For most patients, the actual implant placement takes about 1-2 hours per implant. The surgeon makes a small incision in your gum to expose the jawbone, carefully drills a precise hole, and places the gum to expose the jawbone, carefully drills a precise hole, and places the then a healing cap and suture the gum tissue, or place a composite filling material around the healing cap.
INITIAL RECOVERY PHASE: THE FIRST 7 DAYS
The week immediately following surgery is critical for establishing proper healing. Your body is beginning the recovery process, and your care routine directly impacts long-term success.
WHAT TO EXPECT DURING THE FIRST 24 HOURS
The first day is typically the most intensive part of your recovery. Here’s what’s normal:
- Blood-tinged saliva: Light bleeding or pink-tinged saliva is common for the first 24-48 hours
- Facial swelling: Peaks around 48-72 hours post-surgery
- Discomfort: Most pronounced immediately after the anesthesia wears off
During this critical period, follow these essential care instructions:
– Apply ice packs to your face in 15-minute intervals to reduce swelling
– Take prescribed pain medications as directed, staying ahead of discomfort
– Avoid rinsing, spitting, or touching the surgical site
– Rest with your head elevated using additional pillows
– Limit physical activity to prevent increased bleeding
MANAGING PAIN AND SWELLING AFTER IMPLANT SURGERY
Most patients describe dental implant discomfort as less severe than tooth extraction. Your dentist will likely prescribe pain medication or recommend over-the-counter options like ibuprofen for managing discomfort.
For optimal swelling management:
– Continue ice pack application for the first 48 hours
– Switch to warm compresses after 48 hours if swelling persists
– Take anti-inflammatory medications as prescribed
– Stay hydrated to support healing
– Get plenty of rest to allow your body to recover
By day 3-5, you should notice discomfort beginning to subside. If pain increases rather than decreases after this point, contact your dentist as this could indicate a complication.
Pain Control
Take medications exactly as prescribed.
Typical pattern:
- Ibuprofen/Advil + acetaminophen/Tylenol often work better together than either alone
- Stronger medication may be prescribed for breakthrough pain
Example commonly used schedule (only if approved by your surgeon):
- Ibuprofen 600 mg every 6 hours
- Acetaminophen 500–1000 mg every 6 hours
- Alternate them every 3 hours
Do not exceed:
- 3200 mg/day ibuprofen
- 3000 mg/day acetaminophen (lower if liver disease or alcohol use)
Antibiotics
If prescribed:
- Finish the full course
- Take with food unless instructed otherwise
- Report rash, severe diarrhea, or breathing difficulty immediately
DIETARY RESTRICTIONS FOWLLING DENTAL IMPLANT SURGERY
What you eat directly impacts healing. For the first week, focus on:
Foods to enjoy:
– Yogurt, pudding, and applesauce
– Smoothies and protein shakes (no straws!)
– Mashed potatoes and soft pasta
– Scrambled eggs and soft fish
– Cool soups and broths
Items to avoid:
– Hard, crunchy foods (chips, nuts, raw vegetables)
– Chewy foods (bagels, tough meats)
– Spicy or acidic foods that may irritate the surgical site
– Very hot foods or beverages that may increase swelling
– Alcohol, which can interfere with healing and medications
Remember, don’t use straws during the first week, as the suction could dislodge the forming blood clot.
Soft Tissue Healing Stage: Weeks 1-4
As you move beyond the first week, your gum tissue begins regenerating around your new implant. This soft tissue healing phase is essential for creating a healthy seal around the implant. If the surgeon has placed a composite temporary abutment, you may notice the composite can chip off with excessive pressure or eating. Let your doctor know if there are any sharp edges or chipping.
How Your Gums Should Look During Weeks 1-4
Visual healing progression should follow this pattern:
- Week 1: The surgical site appears red with some swelling; sutures are visible
- Week 2: Redness begins diminishing; the site looks less inflamed
- Week 3: Gum tissue starts to pink up and take on a healthier appearance
- Week 4: Gums should look nearly normal with minimal inflammation; the healing abutment (if placed) is visible and surrounded by healthy-looking tissue
During a follow-up appointment, your dentist will check that your gums are forming properly around the implant. The soft tissue typically takes about 4-6 weeks to heal completely, though the final contours may continue refining for several more months.
TRANSITIONING BACK TO NORMAL FOODS
As your comfort improves, you can gradually reintroduce more foods:
- Days 7-10: Begin incorporating softer solid foods like pasta, fish, and well-cooked vegetables
- Weeks 2-3: Add more texture with foods like rice, softer breads, and tender meats
- Weeks 3-4: Most regular foods can be reintroduced, though continue avoiding extremely hard items and don’t chew directly on the implant site
Listen to your body—if a food causes discomfort, wait a few more days before trying again. Continue to chew on the opposite side of your mouth from the implant site when possible.
OSSEOINTEGRATION: THE CRITICAL BONE HEALING PROCESS
While your gums might look healed within a month, the most crucial part of implant success happens below the surface. Osseointegration is the biological process where your jawbone fuses with the titanium implant, creating a stable foundation for your new tooth.
How Bone Fuses With Your Dental Implant
Osseointegration is truly remarkable. Here’s what’s happening microscopically:
- Initially, blood clot formation creates a scaffold at the bone-implant interface
- Your body sends osteoblasts (bone-forming cells) to the implant surface that will fuse along with the placed bone graft
- These cells deposit new bone tissue directly onto and around the implant
- The titanium oxide layer on the implant allows direct bone-to-implant contact
- Over months, this new bone growth strengthens, effectively “welding” the implant to your jaw
This process creates a connection so strong that the implant essentially becomes part of your skeletal structure. The implant’s specially designed threads and microscopic surface texture enhance this bone integration.
FACTORS THAT IMPACT OSSEOINTEGRATION TIMELINE
Several factors affect how quickly your bone integrates with the implant:
Your dentist establishes a personalized timeline based on these factors. While waiting can be frustrating, allowing complete osseointegration is essential for long-term success.
FINAL RESTORATION STAGE: COMPLETING YOUR NEW SMILE
After the foundational healing is complete, you’re ready for the visible part of your implant—the crown or prosthetic that will function as your new tooth.
Abutment Placement And Healing Collar
Once your dentist confirms successful osseointegration (usually through x-rays and stability testing), the next step is abutment placement:
- A minor surgical procedure reopens the gum to expose the implant(if implant was initially buried)
- A healing abutment will be placed to guide the gum tissue into an ideal shape
- This area typically requires 1-2 weeks of healing as the gum tissue adapts around the abutment
Some patients receive a healing abutment during the initial surgery (single-stage approach), eliminating the need for this second procedure.
Getting Your Permanent Crown Or Prosthetic
The final step brings your new tooth to life:
- Once your gums heal around the abutment, your dentist takes precise impression scans
- These impressions guide the creation of your custom crown, bridge, or denture
- The laboratory crafts your restoration to match your natural teeth in color, shape, and size
- At your final appointment, the restoration is attached to the abutment, completing your smile
After placement, your dentist checks your bite and makes any necessary adjustments. You’ll feel the implant becoming part of your natural smile as you adapt to chewing and speaking with your new tooth.
HOW TO PREVENT DENTAL IMPLANT COMPLICATIONS
Warning Signs Of Implant Failure
Be vigilant for these potential red flags:
- Increasing rather than decreasing pain after the first week
- Significant implant mobility or the sensation that it’s “loose”
- Receding gums around the implant site
- Persistent swelling or infection that worsens after the initial recovery period
- Difficulty biting or chewing several weeks after surgery
- Unusual taste or odor around the implant
If you notice any of these symptoms, contact your dental provider immediately. Early intervention can often save an implant that’s beginning to fail.
Long-Term Maintenance For Dental Implants
Your implant can last a lifetime with proper care:
- Brush twice daily with a soft-bristled toothbrush, paying special attention to the gum line
- Floss daily using implant-specific floss or tools like water flossers
- Consider antimicrobial mouth rinses if recommended by your dentist
- Schedule professional cleanings every 3-6 months
- Avoid smoking completely, as it significantly increases implant failure risk
- Wear a nightguard if you grind your teeth
- Maintain excellent nutrition with adequate calcium and vitamin D
- Avoid using your teeth as tools to open packages or bite hard objects
Remember: while implants can’t get cavities, they can develop peri-implantitis—a condition similar to gum disease—if oral hygiene is neglected.
COMMON QUESTIONS ABOUT DENTAL IMPLANT HEALING
When Can You Return To Work After Dental Implant Surgery?
Most patients with desk jobs can return to work within 1-3 days after surgery. However, if your job involves heavy lifting or strenuous physical activity, you might need 5-7 days off to prevent complications. Always follow your dentist’s specific recommendations, as each case is unique.
For the first two weeks, avoid vigorous exercise that could increase blood pressure to the surgical area. Light walking is beneficial for circulation, but postpone more intense workouts until cleared by your provider.
How Long Should Pain Last After Getting A Dental Implant?
Normal discomfort typically follows this pattern:
- Days 1-2: Moderate discomfort managed with prescribed pain medication
- Days 3-5: Decreasing pain often manageable with over-the-counter medications
- Days 5-7: Mild discomfort primarily during certain movements or pressure
- Beyond 1 week: Minimal to no pain; occasional sensitivity may persist
Pain that increases after the first week or persists beyond two weeks warrants a call to our office. This could indicate infection, implant mobility, or other complications requiring attention.
Will My Dental Implant Feel Like A Natural Tooth?
Once fully healed and restored, most patients report they can’t tell the difference between implants and natural teeth during everyday activities. Unlike dentures, implants don’t shift or require removal.
There is one subtle difference: natural teeth have periodontal ligaments that provide sensory feedback when chewing. Implants lack this ligament, so the sensation while chewing might feel slightly different initially. However, your brain quickly adapts to the difference, and most patients report that their implants feel completely natural within weeks of receiving their permanent restoration.
The greatest compliment to successful implant treatment is forgetting which tooth is the implant as you smile, speak, and eat with complete confidence. Remember, while this timeline represents the typical healing process, your unique situation may vary. Always follow your dental provider’s specific instructions for the best outcome with your dental implant journey.
Dental Composite Fillings
Dental Composite Fillings
Composite (tooth-colored) fillings harden quickly with a curing light, so the tooth is usually functional immediately after treatment. However, the tooth and surrounding tissues can remain sensitive for several days or weeks while the nerve settles down.
IMMEDIATELY AFTER THE APPOINTMENT
Numbness precautions
Local anesthetic may last:
- 1–3 hours for the teeth
- 3–5 hours for lips, cheeks, or tongue
Until numbness wears off:
- Do not chew on the treated side.
- Avoid hot drinks because you may burn yourself without realizing it.
- Be especially careful not to bite your cheek, lip, or tongue.
For children:
- Monitor closely to prevent chewing on numb tissues.
EATING AND DRINKING
Because composite fillings are light-cured, you can usually eat shortly after treatment once numbness fades.
For the first 24 hours:
Best choices
- Soft foods
- Lukewarm foods and beverages
- Foods requiring minimal chewing
Examples:
- yogurt
- eggs
- pasta
- soup
- rice
- smoothies
- oatmeal
Avoid:
- Hard foods:
- ice
- nuts
- hard candy
- popcorn kernels
- Sticky foods:
- caramel
- chewing gum
- taffy
- Extremely hot or cold foods if sensitive
If the filling is large, avoid heavy chewing on that tooth for several days.
SENSITIVITY AFTER FILLINGS
What is normal
Mild sensitivity is common and may last:
- a few days
- occasionally several weeks
Common triggers:
- cold
- heat
- sweets
- biting pressure
- air exposure
You may also notice:
- temporary “electric” sensations
- mild gum tenderness near the injection site
- jaw soreness from keeping your mouth open
BITE ADJUSTMENT
Very important
If your bite feels “high” or uneven:
- the tooth hits first when you close
- chewing feels awkward
- you feel pressure on one tooth
Call our office for an adjustment.
A high filling can cause:
- tooth pain
- jaw pain
- headaches
- cracking of the filling
- prolonged nerve irritation
Adjustments are usually quick and simple.
PAIN MANAGEMENT
Typical discomfort
Most discomfort is mild. Over-the-counter pain relievers commonly used:
- Ibuprofen (Advil/Motrin)
- Acetaminophen (Tylenol)
Follow package directions or your dentist’s instructions.
Avoid NSAIDs like ibuprofen if you:
- have stomach ulcers
- kidney disease
- bleeding disorders
- certain heart conditions
- are taking blood thinners
- were told not to take them
ORAL HYGIENE
Continue normal hygiene unless told otherwise.
Brushing
- Brush gently twice daily.
- A soft-bristle toothbrush is best.
Flossing
- Floss carefully around the filling.
- Some tightness is normal initially.
If floss shreds, catches, or cannot pass:
- contact your dentist
- there may be excess filling material or an overhang
NORMAL SYMPTOMS VS WARNING SIGNS
Usually normal:
- Mild cold sensitivity
- Mild soreness when chewing
- Slight gum irritation
- Temporary sensitivity to sweets
- Mild jaw soreness
Contact your dentist if you have:
- Severe or worsening pain
- Throbbing pain that keeps you awake
- Swelling
- Fever
- Filling feels loose or cracked
- Persistent numbness
- Sharp pain when biting
- A bite that feels uneven
- Sensitivity lasting more than a few weeks
DEEP FILLINGS
If the cavity was close to the nerve:
- the tooth may remain irritated longer
- temperature sensitivity can take weeks to settle
Sometimes deep fillings later require:
- replacement
- root canal treatment
Signs the nerve may be inflamed:
- spontaneous pain
- lingering heat pain
- throbbing at night
- worsening symptoms over time
WHITE FILLING STAINING PREVENTION
Composite fillings can stain, especially during the first 24–48 hours.
Limit:
- coffee
- tea
- red wine
- tobacco
- curry
- dark sodas
Good oral hygiene helps maintain appearance.
IF YOU HAD MULTIPLE FILLINGS
You may experience:
- temporary bite changes
- generalized soreness
- chewing fatigue
Eat softer foods for a day or two if needed.
LONG-TERM CARE OF COMPOSITE FILLINGS
To help fillings last longer:
- avoid chewing ice
- avoid using teeth as tools
- wear a nightguard if you grind your teeth
- maintain regular cleanings and exams
Composite fillings can chip or wear over time, especially on back teeth.